Agents
Overview on Agents, which are responsible for running tests from an Execution.
Agents are responsible for executing the steps defined in the Job on the selected Computer, utilizing devices belonging to the Setup, and uploading traceable results to the Hub. The Agents use Docker Images which contain all applications and the corresponding Typhoon HIL Control Center version. Several ‘instances’ of an Agent can be generated from the same Image. Docker containers allow executions to start very easily with the exact same configuration, ensuring reproducibility and traceability and avoiding singular Environment, Execution, or Test dependency.
There are two types of agents: Static and Dynamic. The main difference between the two is that Dynamic agents start when execution begins and stop automatically once execution is finished. A Dynamic agent does not have a status since it is not manually managed by the user (it is not started or stopped), and the user does not set the workspace, as it is automatically configured for the agent. These agents have a property that allows for multiple instances, enabling several instances of the chosen agent to run simultaneously.
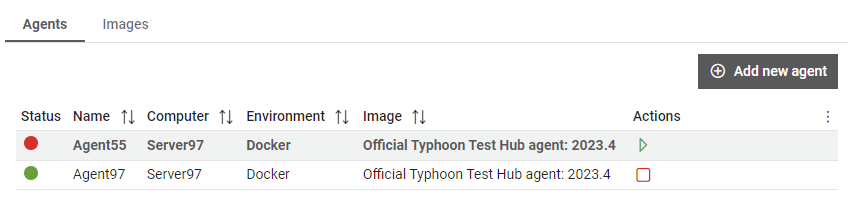
You can see the most important informations about agents in the Agents Table (Figure 1). Here you can create a new agent, update an agent, or delete an existing one. This Agent overview contains only basic data. In the Configuration tab you can configure data if a static agent is offline, while dynamic agents can be configured at all times. The Changes history tab shows all changes for the selected agent. The Execution tab contains a table of executions that have run on a selected agent.
 button, columns of the table
can be customized - hidden or shown depending on the preference. Columns of the table
can be reordered by using drag and drop in the table header. When positioning cursor in
between two columns, cursor for column resizing will show and enable change of the
column's width. All changes made to the table will be automatically preserved.
button, columns of the table
can be customized - hidden or shown depending on the preference. Columns of the table
can be reordered by using drag and drop in the table header. When positioning cursor in
between two columns, cursor for column resizing will show and enable change of the
column's width. All changes made to the table will be automatically preserved. The Agents table (Figure 1) shows the following information:
- Status: Available, Offline, Running and Starting (shown only for static agents).
- Type (Static and Dynamic)
- Name
- Computer on which the agent is running
- Environment (Docker or Host)
- Instances (number of instances for dynamic agents) - it will show number of running instances out of total number of instances when Agent is being used
- Image (if environment is Docker)
Additionally, from this table you can also start or stop an agent.
isAgent OS. Information about
the Agent's operating system will be collected once the Agent is started. For Dynamic
Agent, this information will be obtained once at least one instance of the Agent is
started (during the first execution). Please note that if the Dynamic Agent is started
on a new machine that has different operating system, at least one execution with that
Agent should be performed so that the information about the new OS is obtained. Start agent
Until the user starts Officer on a
computer, a static agent's status is red
 and there is no Play action
available. Once Officer starts, you can press the Play button (
and there is no Play action
available. Once Officer starts, you can press the Play button ( ) and start the
agent. If the static agent is started successfully, then its status becomes green
) and start the
agent. If the static agent is started successfully, then its status becomes green
 , and a Stop button appears in
the table. Pressing the Stop button will stop the agent and
return its status to red. Static agents go offline as soon as Officer is shut
down.
, and a Stop button appears in
the table. Pressing the Stop button will stop the agent and
return its status to red. Static agents go offline as soon as Officer is shut
down.
Static agent details
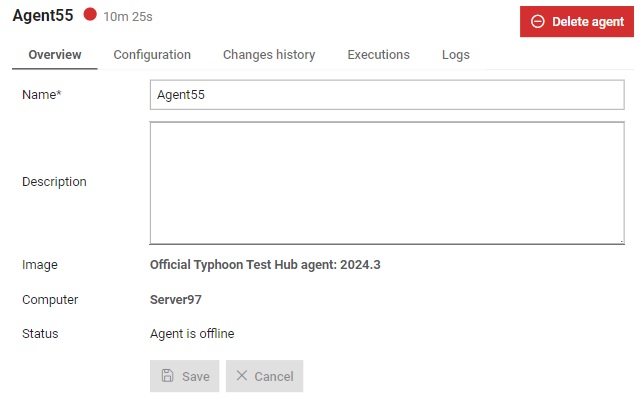
In the Details section, you can find the following tabs:
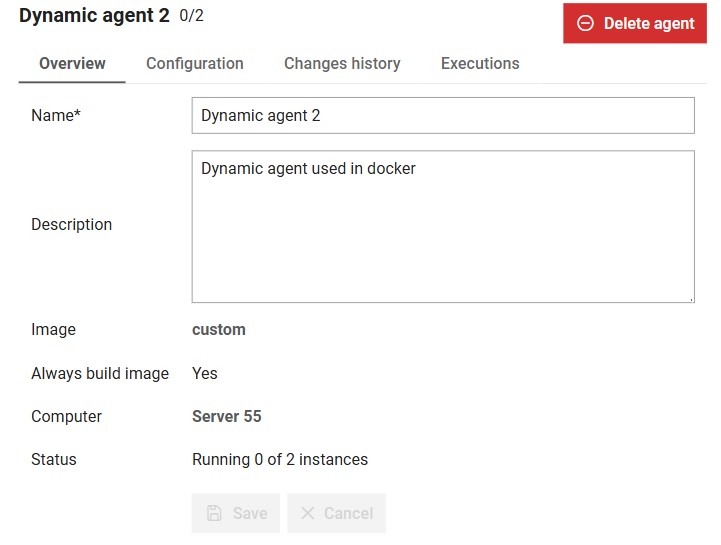
- Overview tab: Here you can update an agent's name and description. Also the agent's status is displayed, together with the image which is used and the computer on which it is running.
- Configuration tab tab: Displays an agent's configuration data. Configurable when the agent is offline.
- Changes history tab tab: Contains agent's history of changes.
- Executions tab: Contains a table of executions that were run on the selected agent.
- Logs tab: Contains a static agent's logs.
Also, when an agent is offline, the action delete agent is
available by clicking on the  button. An agent can be deleted only if there are no jobs
connected with that agent.
button. An agent can be deleted only if there are no jobs
connected with that agent.
Create agent
A new agent can be added by clicking on the  button. This opens the Add new
agent form (Figure 4). Form will vary based on the
agent type. If agent is static, user will need to input workspace, while if the agent is dynamic workspace is
not entered but the number of instances so user can run several instances of the same agent.
button. This opens the Add new
agent form (Figure 4). Form will vary based on the
agent type. If agent is static, user will need to input workspace, while if the agent is dynamic workspace is
not entered but the number of instances so user can run several instances of the same agent.

From here, you can define a new agent as follows:
- Give it a name which will be used to refer to it throughout Typhoon Test Hub. Each name must be unique.
- Write a description.
- Select the Computers where you want this Agent to run on.
- Choose Agent's type (Static or Dynamic).
- Specify the workspace path for Static agents or number of instances for Dynamic agents.
- Mark if the workspace needs to be cleaned before every execution (by default it is marked true)
- Mark if the Static agent needs to be started automatically, once the Officer reboots.
- Select the environment type, which can be either Docker or Host.
- Select the Image you want to use for that Agent (if environment type is Docker). This most likely will represent the version of THCC you want to use. Every new THCC release will be presented as a new Image.
Agent environments
An agent can be run on Host or inside a Docker container.
A Host agent runs as a process on the host computer where Officer is started. This agent has access to the computer file system and can run any command, just likte a user typing into the shell/cmd window. A Host agent can be used for Jobs that build firmware, install upgrades, or upload some files from the Computer to Typhoon Test Hub. It can also be used to run Typhoon tests, provided that THCC is installed on that Computer. You can start multiple agents on a host, but only one of them can run THCC tests at a time. If a user is using THCC manually on the same Computer, this can also interfere with Typhoon Test Hub automated Jobs. When Officer is installed, it creates a virtual Python environment that is used by agents as default Python environment.
A Docker agent runs inside a special docker container. The Computer must have Docker installed. Officer will pull the Docker image before starting a Docker agent. Typhoon Test Hub provides Docker images with pre-installed THCC inside. A Docker agent does not have access to the Host computer filesystem. You can start multiple Docker agents and you can run THCC tests on each of them in parallel. Each Docker agent has several options to configure that offer more control over Docker container behavior, as shown in the Configuration tab.
Configuration tab
Configuration data is visible from this tab (Figure 5). Data can only be updated while Static agent is offline, while for Dynamic agents data can be configured at all times. Form will vary depending on agent type and environment type.
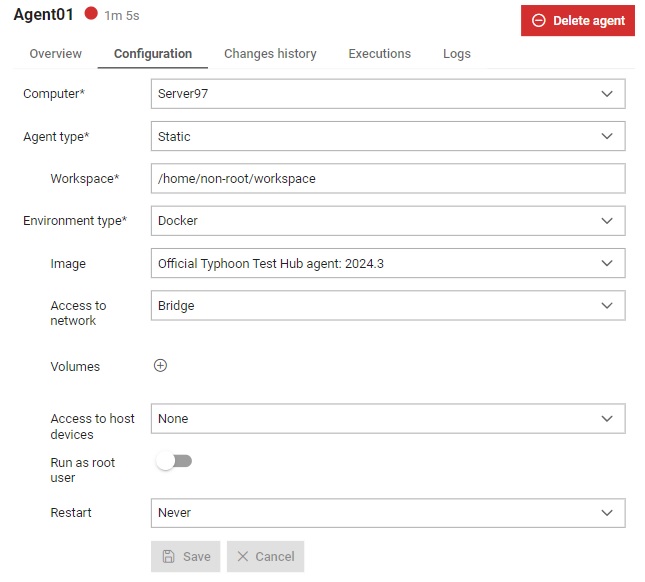
The type of access the Agent will have to the computer when started can be configured. These access types are a subset of the standard Docker Container options. Details on some of these options is featured below:
- Image: Lets you select the THCC version. You can even build custom images.
- Access to Network:
- Bridge: Most used - default option of Docker Containers. This
makes the Docker agent network isolated which allows it to utilize its
THCC instance without interfering with other containers. When running
Typhoon Test Hub in this mode, it is necessary to inform the IP and
Serial Number of the HIL devices that the Agents
should have access to.
-
--ethdev="00604-00-000001, 00604-00-000002" -
--discovery-ip="192.168.32.5,192.168.32.6"
-
- Host: No network isolation between Agent and Computer. Only one Agent can run on that computer. Selecting the Host network could result in tests connecting to a THCC instance being installed and started on the Host.
- Bridge: Most used - default option of Docker Containers. This
makes the Docker agent network isolated which allows it to utilize its
THCC instance without interfering with other containers. When running
Typhoon Test Hub in this mode, it is necessary to inform the IP and
Serial Number of the HIL devices that the Agents
should have access to.
- Volumes: Can be used to persist data generated by a container. It is a way to share data beween host computer and container. The host location is some directory path on your Computer; this will be connected to a location inside the container and that directory will be shared. It is possible to define extra volumes that will be mapped from the Host to the Agent. Additional information about Docker volumes can be found on the Docker website.
- Access to Host device: Choose whether the Agent has access to the Host device over USB, to All devices connected to the Computer, or to None. By default, a process in a container does not have access to host devices, but with these options, Test Hub will start the agent with extra permissions. Be careful with these options.
- Run as root user: If selected, the Agent will have root level access (Admin) to the Computer.One of the best practices while running Docker Container is to run processes with a non-root user. This is because if a user manages to break out of the application running as root in the container, he may gain root user access on the host. In addition, configuring a container to an unprivileged user is the best way to prevent privilege escalation attacks.
- Additional run options: Can be used to define additional docker run parameters that are not covered by other available options. The name of the additional option is mandatory and should correspond to the name of the parameter that is supported by docker-py library's run command. The value of the option is optional because some options do not require for value to be inserted (like --priviledged or --read-only). Value of the additional option should be defined based on the required Python data structure that is supported by docker-py library's run command (e.g. for the additional option with name cap_add value would be ["NET_RAW", "NET_ADMIN"] which docker-py library will translate to --cap-add=NET_RAW --cap-add=NET_ADMIN).
- Restart: Defines when the Agent will restart (i.e. Stop and remove
all its files):
- Never
- Before execution
- After execution: This will ensure resources used by the execution will be released, and the next Execution starts fresh.
Changes history tab
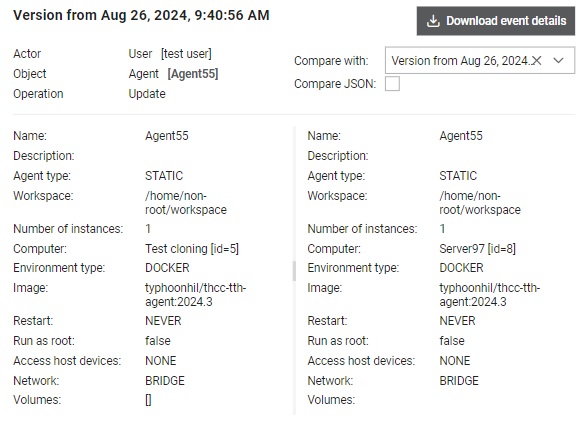
Changes history for the selected Agent is visible from this tab (Figure 6).
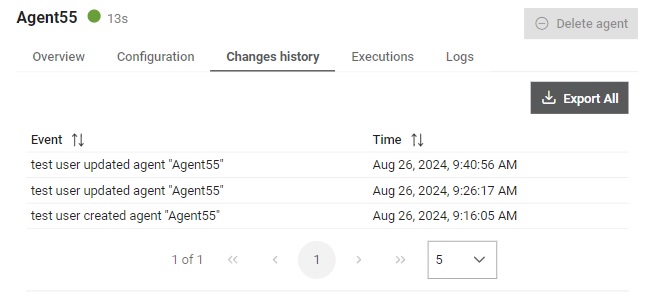
All snapshots (events) will be exported to JSON format and automatically downloaded
by clicking on the  button.
By selecting each line in the table, single snapshot will be shown enabling preview of the made changes
and allowing user to perform comparison between the selected snapshot and and any chosen snapshot.
button.
By selecting each line in the table, single snapshot will be shown enabling preview of the made changes
and allowing user to perform comparison between the selected snapshot and and any chosen snapshot.
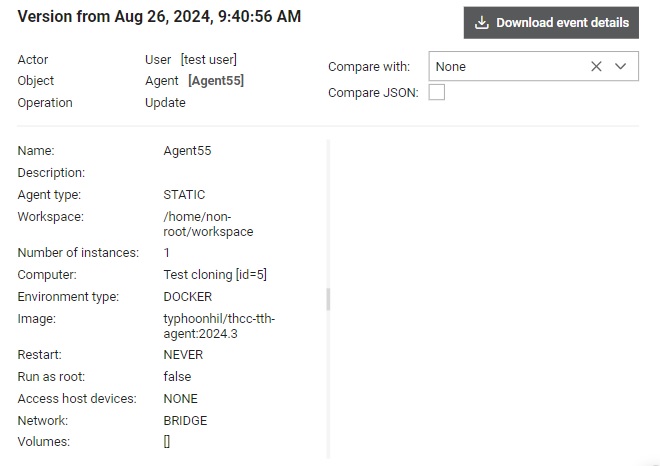
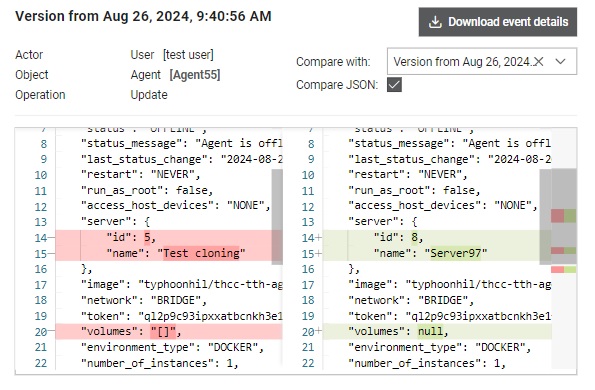
Single snapshot (event) can be exported as JSON and downloaded by clicking on the
 button. Snapshots can be compared through UI or as JSON, with JSON option having
more clearly displayed differences between the two snapshots using Monaco
editor.
button. Snapshots can be compared through UI or as JSON, with JSON option having
more clearly displayed differences between the two snapshots using Monaco
editor.